Hazelnuts: A How To…

Roasting Hazelnuts

Roasting hazelnuts is fast and simple, and is the starting off point to make my Chocolate Hazelnut Tart with Hazelnut Butter Caramel Sauce.

To roast hazelnuts, start out with a 16 ounce bag of raw hazelnuts. Preheat your oven to 350 degrees Farenheit. Spread out the hazelnuts on a parchment paper lined baking sheet. Bake for 10 minutes. Remove from oven and allow to cool for a few minutes. Next, you want to remove the skins. I find the easiest way to do this is with clean hands (no towels necessary). Rub the hazelnuts between your fingers and the skins will fall right off. Some nuts will be stubborn and hang on to their skins, that’s okay too. Place the blanched hazelnuts in a container to cool completely.

Roasted, blanches Hazelnuts

To make hazelnut meal (hazelnut flour): Place roasted and blanched hazelnuts in a blender or food processor and process until crumbly and resembles flour. To make my hazelnut butter, remove 1 1/2 cups of hazelnut flour from the blender or food processor.

Hazelnut Meal (Hazelnut Flour)

To make hazelnut butter: In a blender or food processor, process 2 1/2 cups hazelnut meal, 1/4 cup pure maple syrup, 1/4 cup almond milk and 1/8 teaspoon salt. Blend until very very smooth. Refrigerate until ready to use.

Roasted Hazelnut Butter

Orange-scented Sugar Cookies

Orange-Scented Sugar Cookie Cutouts

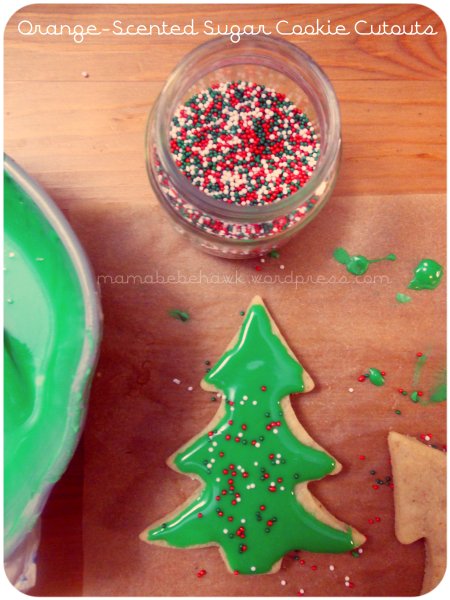
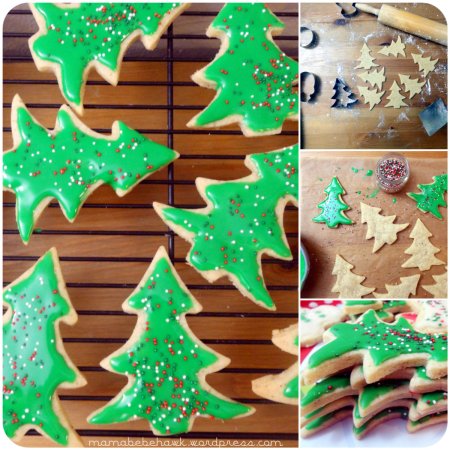
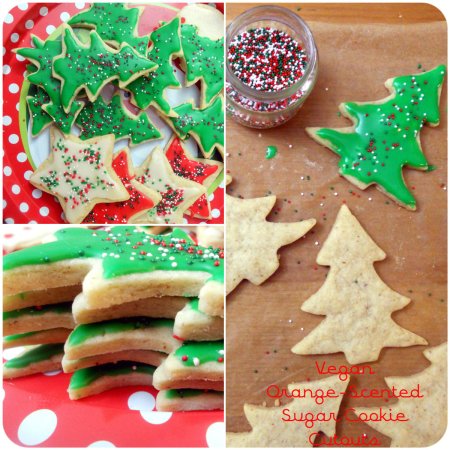
The sugar cookie is the ultimate holiday cookie – it’s timeless, and traditional. We made sugar cookies for Christmas almost every year during my childhood. Usually, only half the batch would turn out edible. For some reason, sugar cookies are tricky cookies. The dough must be perfect: not too wet, nor too dry; and bake them a second too long and they will be too well done. I’ve finally made the best sugar cookie (and they’re vegan)! These cookies are really good. A subtle taste of orange, a perfect balance of vanilla and sugar. The icing is a vegan royal icing that dries hard, which makes them perfect for stacking and gift-giving.

I made them to take with to a holiday party, but I’m sure Santa would love them if you made them, and left them out for him on Christmas Eve.

Orange-Scented Sugar Cookie Cutouts

A few things I’ve learned about making sugar cookies: 1. Always use parchment paper (for all cookies really). You won’t have to grease your pan, saving you product, energy and clean-up. 2. Have lots of patience. Don’t plan on making the cookies in 30 minutes. You will need to make the dough, chill it, roll it, cut it, bake it, and let the cookies cool before you decorate them. 3. Have fun with your decorations. I’ve always been a messy-kind-of artist at most of my crafts (and food is no exception).

Vegan Sugar Cookie Cutouts

I made these cookies while my son was sleeping, and while I was icing them, I kept imagining us making and decorating sugar cookies together next year. The baby stage was a lot of fun, and toddlerhood is so-far-so good. I can’t wait to teach him how to bake and make cookies; and all the other things we will do together.

stack2textVegan Sugar Cookie Cutouts

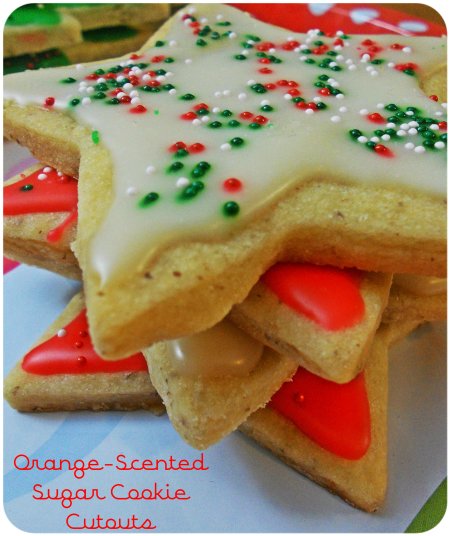
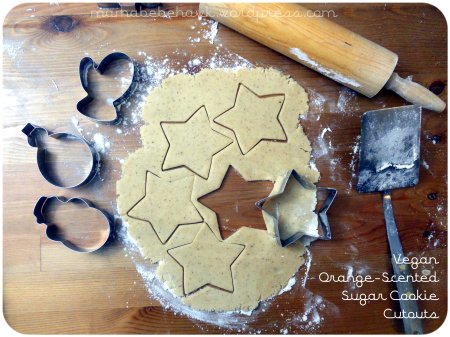
Orange-scented Sugar Cookie Cutouts
makes about 40-cookies

6 cups unbleached, all-purpose flour
1 teaspoon salt
1 cup vegan butter (I used earth balance), at room temperature
1 cup vegan shortening (I used earth balance), at room temperature
2 cups natural cane sugar
2 tablespoons flaxseed meal
6 tablespoons water
2 teaspoons pure vanilla extract
grated zest from 1 organic orange

In a small bowl, mix together the flaxseed meal with the water, put in the refrigerator for at least 5 minutes until ready to use. In a large bowl, or with a stand-mixer, cream together the vegan butter, shortening and sugar for about 5 minutes, until fluffy. Add the flax mixture and whip until pale and fluffy. Next add the vanilla and orange zest. In a separate bowl, sift together the flour and salt until combined. Slowly add the flour to the wet mixture cup-by-cup, mixing gently (towards the end, I used my hands to knead together the dough). Divide the dough into 4 balls, flatten into discs and wrap in plastic wrap. Chill dough in the fridge for at least 45 minutes to overnight (you can also freeze the dough at this point).

Preheat the oven to 325 degrees Farenheit. Place parchment on 2 (to 4) large baking trays. Flour a clean surface and a rolling-pin. Unwrap one of the dough discs, and with a floured rolling-pin, roll it out flat, about 1/4 inch thick or so. Use cookie cutters to make shapes. Use a floured, flat metal spatula to transfer cookie cutouts to a parchment lined baking tray. Bake for 10-15 minutes (my cookies were perfect at 13 minutes). Allow cookies to cool completely before icing and decorating them.

Vegan Royal Icing Recipe
this icing dries hard and glossy, for a lovely and stackable decorated holiday cookie.

2 cups powdered sugar
4-6 teaspoons vanilla soy (or almond) milk
4-6 teaspoons light corn syrup
1 teaspoon pure vanilla extract
1/2 teaspoon pure almond extract
natural food colorings (optional)

In a bowl, whisk together the powdered sugar and soymilk until smooth. Then add the corn syrup and extracts until the icing is smooth and glossy. If the icing is too thick, add a little more soymilk and corn syrup (1/2 teaspoon at a time). Divide icing into smaller bowls, and dye with food coloring if using. Paint icing on cookies (I used the flat end of a fork to spread the icing on) and add sprinkles when icing is still wet. Allow icing to dry for at least 1 hour before stacking or storing.

Vegan Sugar Cookie Cutouts

Make these holiday cookies to share at a holiday party! They go great with a cold mug o’ Nog -or- (as I enjoyed them) with a glass of Moscato.

Vegan Sugar Cookie Cutouts

Happy Holiday Baking to All!

Vegan Sugar Cookie Cutouts

Pumpkin Cranberry Loaf Cakes

Pumpkin Cranberry Loaf Cakes

instagramcrochet

I’m back with what may very well be my last pumpkin recipe post of the season. I had the pleasure of attending two Thanksgiving dinners this year, which I of course made desserts. For the first dinner, I made a sweet Pumpkin Bundt Cake with Citrus Disaronno Buttercream. For the second dinner, I made very delicious Sweet Potato Cupcakes topped with vegan marshmallows and vanilla glaze and also a fabulous double-layer pumpkin cheesecake. Since I buy my pumpkin puree in bulk, I had lots of it leftover from the cheesecake, and I needed to make something with it. The result: this Pumpkin Cranberry Loaf. It’s also made with fresh, prepared cranberries, but you could use dried cranberries, or fresh, chopped cranberries too.

Pumpkin Cranberry Loaf Cakes

This cake would be really good topped with a spiced orange icing, which you could easily whip up by following a basic vegan vanilla icing recipe, and adding some nutmeg and orange zest. But even without an icing, this cake is delicious. Not too sweet, very moist, tangy and subtly spiced. If you have them, throw a handful of chopped pecans in with the cranberries. I would also serve this cake with hot tea or coffee, for brunch or dessert.

Pumpkin Cranberry Loaf Cakes

Pumpkin Cranberry Loaf Cakes
makes 4 mini or 2 regular size loaf cakes

2 cups pumpkin puree
1/2 cup non-gmo canola oil
1/4 cup almond milk
2 cups natural cane sugar
2 teaspoons pure vanilla extract
3 cups unbleached, all-purpose flour
2 teaspoons pumpkin pie spice
1 teaspoon baking soda
1 teaspoon baking powder
1/2 teaspoon salt

1 cup fresh, prepared cranberries (or raw, chopped cranberries; or dried cranberries)

Preheat oven to 375 degrees Farenheit. Lightly grease 4 mini or 2 regular size loaf pans. In a large bowl, mix together the pumpkin, oil, almond milk, sugar and vanilla. separately, sift together the dry ingredients: flour, baking powder, baking soda, salt and spices. Gently combine the dry ingredients into the wet, when mixture comes together, add the cranberries, being careful not to over-mix. Pour the batter into the prepared loaf pans, half-full. Bake in oven for 50-60 minutes, until a knife inserted comes out clean. Allow to cool before slicing and serving.

Pumpkin Cranberry Loaf Cakes

Pumpkin Cranberry Loaf Cakes

Make this bread to share for the holidays! Enjoy!

Canned Spiced Apples

I love to can, and to make jams and preserves. It makes me feel nostalgic of a time I may have lived in a past life, or something. I love the old-fashioned feel of food preserving. I know, I know… I am a mega dorky nerd.

My mom also loves to can; she makes the most amazing pickles, relishes, canned sauces and pie fillings. It’s amazing that she finds the time to do these things. That said, it’s amazing how most of us find the time to do the things we do! Right? This year, after making relishes, pickles, fruit jams, and a list of other things (I’m sure), my mom asked me to make her apple pie filling. I of course accepted. So, for this VeganMoFo post, here is my version of my mom’s canned spiced apples.

Canning is actually very easy, just a little time-consuming. If you have everything ready and in place, it will be greatly beneficial to you during the canning process. The first thing I ever canned was homemade apple butter. Then I made grape jam, fig preserves, plum jam…. the list goes on. Once you start canning, you will become addicted and want to can everything you can think of.

Canned Spiced Apples
Ingredients:
12 pounds apples (I used 6 lbs. golden delicious + 6 lbs. jonathan apples. Do not use red delicious apples. You want a sweet, crisp apple. The fresher the apple, the better – soft, overly ripe apples are not good to use for canning)
1/4 cup lemon juice
12 cups water
1 – 12 ounce container of apple juice concentrate
4 cups natural cane sugar
3 Tablespoons ground cinnamon
1 Tablespoons ground nutmeg

6 – 1 quart (32 ounce) glass canning jars w/ lids
large stock pot for cooking apples
large stock pot, pressure canner or water bath canner – for sealing jars (I use a regular stock pot for canning, so information on using a canner can be found here– and actually the site has a ton of useful information on canning).
a jar lifter or tongs

Directions:
Wash and sterilize your canning jars and lids in boiling hot water – or in the dishwasher. Set aside on a clean towel to cool and dry.

In a large bowl, pour in the lemon juice. Peel, core and slice your apples, you want slices about 1/4 of an inch (not too thick, not too thin). Place apple slices in the bowl with the lemon juice as you slice them, toss every so often to coat. After all your apple slices are ready, prepare your liquid. In a large stock pot, bring the water to a boil, add the apple juice concentrate and sugar and stir. Dissolve completely. Add cinnamon and nutmeg. Add apple slices and stir. Reduce heat and simmer for about 5 minutes. You just want the apples to be blanched, and not cooked too soft. Turn off heat.

Spoon apples into jars. Fill the apples almost all the way up to the top of the jar, leaving about 2 1/2 inches of space. Then, ladle the hot liquid syrup over the apples until about 1 inch to the top of the jar. Eliminate air bubbles by gently pushing down on apples with a spoon. With a clean, damp kitchen towel, clean off any spilled liquid off of the jar, especially the rim. Seat the lid on the jar and tightly twist close the lid. Repeat these steps for all jars. You will have some liquid syrup  left over. (You could use it as a base for apple cider! I mixed half the leftover liquid syrup with water and it made a yummy cider).

Now, to create a vacuum seal for your jars in a hot water bath: Add enough water to the stock pot to cover the jars by 2 inches. Bring water to a boil. Carefully lower the jars into the boiling water using the tongs, leaving 1/2 inch space between jars. Wait for the water to return to a boil and then wait 8 minutes (i.e., process for 8 minutes).Turn off heat, remove jars and place them on a flat surface where they can rest undisturbed for 8 hours. After this time, test the lids by pressing down on them. If they are tight and don’t move, the seals are good. Canned apples will stay good for up to one year if stored in a cool, dry place.

You can use the apples for pies, cobblers, tarts, as a topping for ice cream or pancakes… as a filling for muffins… the possibilities are almost endless.

Homemade Corn Tortillas

Homemade corn tortillas are really easy to make actually, and they are really impressive (at least I think so). They are also much more delicious freshly made. This was my first time making my own tortillas, but I figured I might as well give it a go since I said I’d be making tacos for dinner tonight. The recipe for these tortillas came right off the back of my bag of maseca. The recipe is so easy and calls for only three ingredients: maseca, water and salt.

I don’t have a tortilla press (yet), so I used two plates to smoosh the tortillas flat. It worked just fine really, and earned me bonus punk points. To make homemade corn tortillas: all you have to do is measure out your maseca (2 cups), water (1 and 1/4 cup) and salt (1/4 tsp.) and combine them together in a bowl. Mix until a soft dough forms (I used my hands). Roll dough into 16 balls and cover them with a damp towel so they don’t dry out.

Press the balls in a tortilla press covered in plastic wrap – or – use my plate trick (make sure the plates are covered in plastic wrap). Carefully remove tortilla from plastic wrap and warm in a preheated cast iron skillet on medium-high heat for 30-50 seconds per side. Repeat for all tortillas. Place the tortillas on a plate and cover with a dry napkin to keep warm. To store them, allow to cool, wrap in plastic and store in the refrigerator for up to one week.

Taco night turned into tostada night with these homemade tortillas. After the tortillas were cooled, I fried them in a little corn oil until slightly brown and crispy. I topped them with seitan seasoned with salsa verde, black bean spread, tomatoes with cilantro, daiya cheese and a touch of sriracha. They were so good, mmm….

 In conclusion, you should definitely make your own tortillas. It was actually quite easy and didn’t take long at all!